Slider

SEWN: Xmas dress triumph???

Saturday 22 December 2012

I'm baaaaaaaaccccckkkk. Yep, it's been a considerable while... things have been... difficult. There is a sense of a stigma attached to people going through a tough time and in blog world things are usually so shiny and happy. I just wasn't there this year with a very tough few personal things going on. It's been a challenge simply pulling myself through a day let alone creating practical, let's not even talk beautiful, garments. My sewing mojo didn't just take a short holiday, it left with threats never to return. Cheeky bugger.

So it's been a while, but I am starting to feel a little better and when that started to happen the desire to create also returned.

Let me present M's third Christmas dress. Not third this Christmas - as in I have created one each year for Christmas and this happens to be year 3. Oh lord, perhaps my ability to create sensical prose will also return soon. Tadaaaaa!

Excuse the rather lame photography, I clearly still need to take some lessons

I really love this dress. It's Anna Maria Horner's Paper Fan Dress, a wonderful, free pattern download. Woot, woot - love a free pattern, especially one as beautiful as this! It's a basic lined bodice, with a wrap back button closure. Box pleats at front, an interesting waistline finishing, and knife pleats at the left back wrap complete the look.


I had a goal this year. I wanted to create largely from my stash as it has kept growing and growing with few signs (at least this year) of being used.

Success one: The gorgeous red skirt fabric. I scored this beautiful one metre piece from the wonderful Leisl at Jorth when I won her birthday giveaway. It's been sitting impatiently quietly awaiting the perfect opportunity to offer itself up. When I started to consider M's Christmas dress I immediately thought of this. I'm sure it's not meant to be a Xmas print, but it reminds me of Christmas tree baubles and snowflakes. So whilst fitting a Christmas theme, it's not kitsch... I'm not too kitschy... and I've aimed to avoid the Christmas theme overtaking the dress too much. Anywho, according to Leisl it's a Japanese cotton and it's a lovely quilting type weight. And perfect for a Japanese inspired Paper Fan dress.

Speaking of which, check out the gorgeous knife pleats which create a paper fan effect at the back opening...


Success two: The lining. I had another completely different dress in mind when I first considered this make, so hadn't factored in lining. I was saved from yet another trip to the fabric shop by using one of M's old baby wraps that I had made out of a soft pink cotton voile. The wrap had been used to death and is soooo soft. It made a perfect lining and it's kind of nice to have preserved the wrap in some small way. Call me sentimental...

And there is Santa making his appearance

Success three: Bodice fabric. I wanted a contrast/coordinating bodice and had already purchased the blue quilting weight cotton for a totally different project that never eventuated. It was a half metre and cost around $3 at the time. And it just happened to tie in with the blue in the skirt just perfectly.

In the end, the only thing I had to purchase were the buttons - $4. Pretty thrifty, nifty dress.

Triumph? Hmmmmm, it would be if the dress fitted. When will I learn to trust the pattern? I made a size 3 for my 2.5 year old, even though the measurements suggested that a size 2 would fit. Bugger... dress too big by a mile. Ah well, she loves it and is gonna wear it anyway. So... I say triumph.

If I can get my grouchy toddler to actually stand still in the dress, or even pose nicely, I'll try to get a less boring action shot in here. Wish me luck!

Merry Christmas everyone!

SEWN: Vintage Vogue 9247

Wednesday 13 June 2012

I'm finally back!

So this creation was one I started prior to my redundancy. I had gotten about halfway when all that happened and as I wrote in my last post, I just couldn't face sewing for a time. All that "yuckiness" just seriously got me down, and I just couldn't find the joy in my sewing. But I now feel really good, and hence finally getting this done.

May I introduce vintage Vogue 9247, view B


How very pirate-y! Don't you just love the style of the 70's? Or is that just me?

I had meant to blog about how this pattern came into my hands, but never quite got there. So long story short. My manager, prior to my redundancy, moved a few months ago and having thought she'd got rid of her pattern stash years ago, came across the mother lode of mother lodes. Knowing my obsession interest in vintage patterns from the 60's and 70's and having admired many of my creations she knew this would be just like Christmas for me. And before I knew it, I landed about 50, yes 50, patterns from that era. Oh the joy! The heavens opened, the angels sang... oh sorry, got a bit carried away. Let's just say I was a little bit excited.

And this is my first creation from that stash...


Can I just take a second now and apologise profusely for the dreadful photography? Two things, 1) I no longer have a hubby around in daylight hours to take my photos (he's got a new job outside the home), and 2) it has done nothing but rain in Sydney since the day I finished this, so I have had no natural light to do this right.

Today saw a brief bit of sun come through and I grabbed a chance to use my timer function on my gee-wizz camera for the first time. Suffice to say, I need some practice...


This blouse is made up in a gorgeous cotton Tana lawn from Spotlight. I haven't sewn a shirt of any kind before and I found this reasonably challenging.


The construction was like a jigsaw puzzle with that neckline/yoke thing going on. I made a few departures from the instructions, which I now feel may have been a mistake. I used a lightweight fusible interfacing in the neck and shoulder facings, when the pattern called for a non-fusible. I was going for ease of construction, but I have found that no matter how much I press those facings they seem to be perpetually slightly wrinkly, which may be as a result of using the fusible on this fabric - not such a good match perhaps? You can perhaps see this issue in the image below.


I sewed in the sleeve cuff/bindings incorrectly and so there is stitching visible on the outside, but I'm not too concerned with this given all the topstitching elsewhere.

I had some great bright orange/red vintage buttons in my stash. The pattern required 8 buttons and a snap fastener, but I only had 7 buttons, so I re-spaced the buttons on the front closure. I'm perfectly happy with the results. There is also the required snap fastener near the bottom of the shirt front.

I made no sizing alterations. It's quite forgiving given it is quite blousey.

I actually really like this blouse! It is really meant for a tucked-in look, but I am not much of a tuck-in kind of girl and I'm equally happy with it un-tucked. I get the feeling that it occasionally gives the impression of a maternity top from certain angles, so I am wearing it with very slim pants to get the right silhouette.

Sew that's it! Another vintage pattern made up and loved!

Where to begin...

Tuesday 1 May 2012

... I lost my job. And there it is.

Everything has a beginning, but mine feels currently like an end.

Almost two weeks ago I lost my job. No, I didn't do something horrible, under-perform, or otherwise upset management. I was made redundant.

Now there is a word.

I have to keep reminding myself that it's not about me, I'm not redundant. My job is. But it gets kinda hard from time to time.

Australia, in general, has escaped the very worst of the GFC. We weathered it all quite well for the most part and certainly in comparison to other countries out there. But it appears we are still not immune.

A little bit of history might not go astray right about now. My hubbie and I have known a little bit of Struggle Street the past few years. P has been owner and director of his own successful company for pretty much his entire adult life. He's never really worked for anyone else, except for the typical teenage job at a fast food franchise who's name will not be spoken.

When the pain of the GFC started to be felt in Australia I was about to go off on maternity leave to have and care for M. At that time, about 2 years ago, P's business started to feel quite the proverbial pinch. It was a stressful time and hard to handle with a new baby in the house and no immediate return to work feasible or acceptable for me. But we struggled on, living off our savings, with P out there trying his darnedest to get things happening. But the work for him in his industry just... dried up.

It was a really awful time for him personally as he struggled with a misplaced sense of failure and tried desperately to save his business and generate an income. But he realised his heart just wasn't in it anymore. When the inevitable outcome reared its ugly head very recently, and we reached a decision that it was time to shut up shop and for P to look for work elsewhere, it followed a prolonged period of mourning and mounting financial burden. Miraculously, P was offered a job within one month of job-seeking, and the celebrations began. With his new, modest salary, and my part-time wage we might be able to breathe finally. Pay our expenses and mortgage and just get on with life after being on hold and flying by the seat of our pants for what felt like such a long time.

Except life had something else in store for us. It was a normal day like any other.

Except for one small thing... I turned up for work and a few hours later walked out clutching a letter of apology and my referral to a careers consultancy to help me get back on my feet. I was not alone. A quarter, yes a quarter, of staff in my office also got handed that letter and referral. "Shocked" doesn't begin to explain it.

I was floored, devastated, horrified, terrified, and initially at least, strangely energised.

I feel for those who were left behind, returning in the days following to that ghost town of an office. Seeing the empty desks of their former colleagues and being constantly reminded and perhaps even feeling a little guilty about why they were there and others weren't.

What I don't feel is any sense of resentment or bitterness. It's weird... I guess having managed businesses myself before I know that this was nothing but a business decision. It's not personal, in fact if the cuts hadn't been made the organisation would have folded completely very soon. And we are not talking about some corporate juggernaut. I worked for a wonderful Australian not-for-profit, non-government organisation whose work is without doubt incredibly valuable to the lives it touches.

I am left wondering where in the world to go next. I have limited options as I have limited childcare and no flexibility for expanding this at least in the short term. Accessing long daycare, in Sydney at least, is a battle of epic proportions. Wait lists are incredibly long and vocal chords are worn out with the begging to centre directors to find you a spot. Hah! Maybe I should go into childcare! I fear finding a job that slots right into those three days of care may be quite difficult. My careers counsellor tends to agree. But work I must...

I am a mother and a wife, but I am also me and my career is part of who I am.

In the meantime I have found that I am unable to focus, prone to weepiness and simply feeling a bit lost to put it mildly.

Can't sew... I can't focus long enough and the idea of picking up my half-completed project is too daunting a prospect. How odd, since some of my greatest peace is found with a project in hand. So I may not be posting for a little while whilst I ride this new challenge. I know there are many worse off than me and I am thankful for the love and the beauty and the joy in my life.

And lastly - Good Luck P! You start your new job today and I am so incredibly proud of you. You are a star, a shining beacon in my life and I love you...

Here's to new beginnings.

SEWN: Vintage Simplicity 7381

Monday 2 April 2012

Ooh, ooh, ooh I've been so excited to share this project!

The very lovely vintage Simplicity 7381 (dated 1967), View 2 dress.


I teased about it here and seriously it wasn't to build the excitement. I finished this dress a month or more ago, but we had raining horrid weather for weeks which put paid to any photo shoots. When the sun finally came out to play I was laid up in bed with a tummy bug, but in the name of duty I dragged myself out and into this dress and tried a shoot - the resulting shots were less than stellar.

But today we had a lovely early evening light going on, after a perfectly warm, autumn blue sky day. Sigh. So I dragged that dress on happily, got M and her bike (had to keep her occupied), and thrust the camera at darling P for a quick re-shoot.

And here she is...


I love her! Fabric-wise I was kind of channeling Jorth's Graffiti dress. I know, I know not quite the same colour etc. But I wanted that feeling of a piece of cloth that had been streaked with paint randomly, wantonly, breathtakingly brightly.

I found this perfect (in my opinion) lighter weight cotton sateen at a little local fabric shop. It was a dream to work with and feels lovely to wear. But those who have read my previous posts know I am a bit obsessed with fond of cotton sateen. I actually thought it was rayon when I first caressed it as it seemed so light and drapey, so imagine my joy when it turned out to be cotton sateen.

I love the sash belt. I thought it would slip and not stay snug around the waist, but the whole sash is interfaced so it actually holds its shape and snugness surprisingly well, and whilst a minor adjustment might be needed from time to time it's nothing major.

And to finish off some cute purple buttons...


Oh I do like that sash...


In terms of construction, I made a few diversions from the instructions. The changes were minor and simply done as they made more sense to me. If you'd like the details you can check out my pattern review here.

As per normal, whilst this was a size 12 pattern and that's usually a good fit for me at the hip and a bit too big at the waist, I found it was hugely sack-like with oodles of ease in a non-flattering way all over. I ended up taking literally inches out of the bust and waist and a couple more off at the hip, taking it in straight down the side seams. I really need to learn to adjust by doing something other than just that. To be honest, it probably would have been better spreading those taken-in inches over the side seams and centre front and back seams as well. I'm wondering if the bust darts are actually sitting where they should...? And next time I'd narrow up the shoulders as well, you can see they are extending past the shoulder a little.

So there she is readers. I have a little crush...


Did you notice I'm not the headless seamstress in these shots? I've been cropping out my head from shots for so long, but just got a lovely new haircut and thought I'd take advantage of looking neat and tidy for a change. It may not last...


SEWN: Not such a picnic (Class Picnic Blouse)

Saturday 31 March 2012

So I thankfully, I must say, just finished this project. I very rarely (if ever) not enjoy sewing, and especially not when its an Oliver + S offering. But... this one got me down and I was sooooo glad to finish it!

Here M's new blouse, in a lovely vintage print cotton voile.


I had been really looking forward to this project. I had purchased the fabric when M wasn't even a year old and have been waiting for the perfect shirt/top/blouse pattern to come along. Enter the Oliver and S Class Picnic Blouse.

"So, the problem?" I hear you ask. Look I can't quite put my finger on it. The instructions are clear, there isn't anything at all technically difficult... I just kept making a mess of it.

The gathering stitch for the front and back panels left gaping needle holes (very visible to the naked eye) when I removed the stitches. And, yes, I do believe that I used the correct needle size. I just hope that they may shrink back a little when I wash the top next time. 

Next up - my front yoke where it is edge-stitched down is just... ick. I just couldn't get the stitching straight and I've edge-stitched a thousand times. I also managed to not draw the front yoke piece down far enough to cover the stitches from attaching the yoke facing. I could have gone back and fixed it (maybe), but I just got irritated. Not sure you can see it here...


You can kind of see it on the far left of the front yoke seam, but when I look closely myself I realise I'm being a bit hard on myself. Sigh... maybe it was just a mood thing.

I continued on and the thing just seamed (get it, get it) to take forever. I could tell that it was theoretically supposed to be a "quick make", but man this thing would not quit.

Then I got to sewing the deep (1.5 inch) hems on the sleeves. Have you ever tried to sew sleeve hems on teeny, tiny clothes? I have and I've never had so much trouble. I could not orient the very deep hem for sewing so that I didn't catch the other side. Mind you I persevered amongst much swearing and got it done.

Then I worked out my problem... sewing at night! My mind seems to switch off as night falls, always has, but when you are a busy woman you sew when you can, and when I can is at night. I looked at it again in the lovely light of day today and saw my error immediately. It was so stupid as to be... stupid.

But in the end I couldn't wait to see the back of this project.

I also feel vaguely cheated. I have to say firstly that I love Oliver and S patterns. They are beautifully designed garments for little people with excellent instructions and generally quite full of beautiful details. This one though is just... a... blouse. Almost a peasant-type blouse. It's just kind of... blah. And those gorgeous details I've come to know and love from O+S seem absent. M has a new top, but it doesn't feel very special. 

To add insult to injury M bugged me throughout its construction to try it on, try it on, but when I actually finished it she refused to let it near her. Spooky... maybe it really does have bad vibes.

BUT I am excited to share my next project with you - a complete success in my humble opinion. I'll be back soon to share.

New York, New York...

Thursday 22 March 2012

Oh my, I love New York. Well I love the idea of NY, haven't actually been there, but plan on it one day!

But what I do know and love is Tessuti's New York Cape!!! For all you Tessuti followers out there, the New York Cape pattern has just been re-released. Right in time for the coming southern hemisphere winter! And guess what landed in my post box today??

Tadaaaaaaaaaa!


My very own copy, hot off the presses. The joy, the excitement! And it comes all tied up with ribbon like a lovely gift just for me.

And a personal card from Colette...


I had been hoping and praying this pattern would be re-released this year since I missed out on both sold-out print runs from last winter. I happened to send an e-mail to Tessuti early this week and caught them just as they had loaded it to their website and the lovely Colette sent me the link. Purchased yesterday, received today. Now that's service. So I suggest you get in quick, if last year's demand is anything to go by. Now be warned, this is by no means a cheap purchase at $35 (AUD), and my little fingers did hover just above the "purchase" button for quite a bit longer than normal, but I just couldn't resist.

You can see Julia Bobbin's version here and Tessuti's here. There are others out there to see, but these are two of my faves. Sigh. Now to find a fabric and get started... this sewing obsession hobby is going to send me broke.

I have another completed project to share too, I just want to re-photograph it. Check out this vintage Simplicity 7381 pattern. I really love the late 1960's and 1970's shapes. They work really well on my body shape and they are so comfortable to wear.


In particular I love this view...


... and recently made it in a gorgeous colourful, lightweight cotton sateen. Those of you following my projects will know of my obsession love of sateen. I really don't mean to gravitate to it constantly but I do love its drape, body and hand feel.

All will be revealed... here's a sneak peak of the fabric


SEWN: My Colette Sorbetto

Tuesday 13 March 2012

I've wondered a few times over making a Colette Sorbetto top. It is such a reviewed, made and talked about item of clothing in sewing and crafting blogland I wondered if it hadn't just been "done like a dinner".

But... I found myself checking out images on a Google search and started to get inspired. I also had a lovely 1.3m piece of cotton lawn that was begging to be made up. In all honesty it has been waiting, partially prepped, for its originally planned incarnation as a Lisette Market Blouse. I literally had that pattern prepped and ready to go and upon laying it out on the fabric I realised that my fabric was so not square and no matter what I did to try to resolve it, I could not for the life of me line up the pattern square when folded. It drove me to tears/madness It had me a little riled up and I eventually gave up. And whilst I am really attracted to the Market Blouse in theory I was a little concerned about its reality for me. I rarely wear short sleeves... I have these weird skinny/muscly arms and they just look like little sticks when hanging outside short sleeves. And I NEVER wear button down shirts (even if the Market Blouse involves a faux button placket thingy and doesn't actually open at the front). I love them on other people, just not me.

So the Sorbetto it was. And it's a free download, woot, woot, sa-weet! Thanks Colette Patterns, you rock. Did I mention it's FREE???

And here she is!

My lovely Sorbetto
I love this fabric, and for some reason I got the pattern to square for this simple top. Hard to make out the detail in this shot, but it's a lovely orange colour with a navy print. The print include little Japanese characters and shapes reminiscent of petals. It kind of has an edgy feel that I was really attracted to.


I really love it with my favourite pair of jeans of all time. I will note that it is designed quite short and the length pictured is after adding about 1.5 inches extra to the bottom of the pattern and doing a very tiny hem (I didn't have enough fabric for adding anything more). I am not particularly tall, perhaps just over average at 5'6"/167cm, but with a proportionately long body. I will make it again, but next time add a good 3 inches in total to the length.

And I happen to have the perfect beads to go with it, when I feel like accessorising.


A lovely back view
It fits quite nicely, and I made no alterations (other than length) to the size 2. The only other thing I'd like to try and change next time is the size of the armhole. A few reviewers have noted it's a snug fit under the arm and I tend to agree. It does make me feel a bit cramped in that area which is a shame as it's such a light and breezy feel to the rest of the garment.

I also did French seams for the first time ever and I'm hooked! They make for such a neat professional finish.

There are directions associated with the pattern for making your own bias tape, so that you have matching bindings. But given my recent sew-jo issues I really needed a quick win, so I cheated and bought what turned out to be a perfectly matching ready made bias-binding. It meant I didn't have to spend hours making up the binding. But ick... why can't you buy anything but poly cotton bias binding. It's so scratchy and seems such a shame to add to a garment made out of this lovely cotton.

But in the end I really love this top. I see myself making this in a block colour next time so that the pleat at the front "pops" a bit more. And maybe some bows or buttons. Stay tuned!

Oh where, oh where has my sew-jo gone..

Monday 27 February 2012

... oh where, oh where can it be?

Oh my, I have seriously lost my sewing mojo. Is it the time of year, lack of inspiration? Well, I know it's not the latter, inspiration is out there always. It might be the nasty croup M brought home in the last few weeks that had us up for nights on end, that then turned into an even nastier chest infection, that she then kindly passed onto Mummy and Daddy in the form of the most dreadful cold. I've renamed our home "The House of Ick". We are still struggling striving valiantly onwards though...

I don't think I've ever gone this long without sewing in a long, long time. You know, perhaps it's also that I've been pumping things out at quite a rate (for me anyway!), and really, how many items of clothing can one person wear? I've got a heap of dresses, a few new skirts, I've been making stuff for M... seriously, when will this stuff wear out so I can "replace it".

Well it seems M has helped me out there. I swear that child grew inches overnight. Suddenly all her pants were looking more like capris!

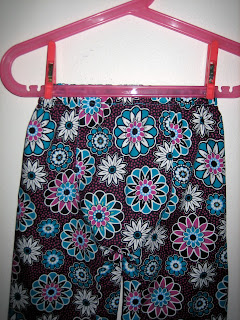
So I share with you my latest project, the piece to break the sewing drought. M's new Big Butt Baby Pants.

Don't worry, I didn't accidentally cut one leg shorter than the other... all will be revealed.

Now if you don't know of this pattern and you have a little one to sew for, you gotta get it. It's from Rae over at Made By Rae and I have literally made a million pairs - well maybe not literally, but you get my drift. This pattern rocks and the finished product is just awesome.

Why so exciting? A few reasons...

  • You can make them for summer or winter, simply by changing the fabric used (I've made them in denim, corduroy, quilting cotton, flannelette, lawn, you name it).
  • You can add little features that change the look completely, so it doesn't look like they're wearing the same pants everyday. Rae's pattern includes a frilly butt version and cuffs, just to start you off. I've also done them with knee pads (for those crawling months) and with a cute embroidered flower on the butt.
  • They've got space for a nappy (even a cloth one)

Dreadful shot, but trying to show the butt panel at back

  • The pattern comes with all sizes included from 0-3 months, right up to 2T.
  • You can protect gorgeous, fragile little baby and toddler legs that tend to be prone to scratches and bumps when learning to traverse this brave new world on all fours or on tippy toes.
My little M has been in long daycare three days a week since she was 8 months old (oh, the guilt of a working Mum). She started in a long hot summer and was just beginning to crawl. She was always getting bumps and scrapes when wearing shorts, so I decided to make a few pairs of these in a super light cotton (gotta keep cool) to help protect those chubby little legs. She loves them - whenever I make a new pair, even today, she wants to put them on straight away. She still wears a pair to daycare everyday, 13 months later.

This latest version I did with cuffs. M seems to grow at the rate of knots lately - up, but not out. For this reason cuffs are awesome. I can fold them up when she first starts to wear them and flip them down as she starts to grow. Here's a close up showing one up, one down.


They always draw compliments, with lots of requests from other's for their own custom pants. You are allowed sell your versions (handmade, not production line), with design credit given and registering with Made by Rae as a seller. I haven't gone this route yet (haven't made them for anyone other than M, just no time), but it could be interesting to be a seller if I find the time in the future.

Oh and the best part? They are super quick to whip up. I've renamed them "nap time pants" in our house as they are so quick to run up they can be completed easily during a 2 hour nap!


SEWN: Simplicity 2215 by Cynthia Rowley

Tuesday 31 January 2012

So it's been a while. I looked in horror at the date of my last post... and then thought "So what? I said I'd sew at my own pace"... yeah, but then another voice said, "But people will lose interest". Bollocks to that, here I am!

I actually finished this project over a week ago, but it's taken me this long to get some photos taken. I've been indulging one of my other passions... mountain biking - but more of that another time.

So here it is...


Image from http://www.simplicity.com
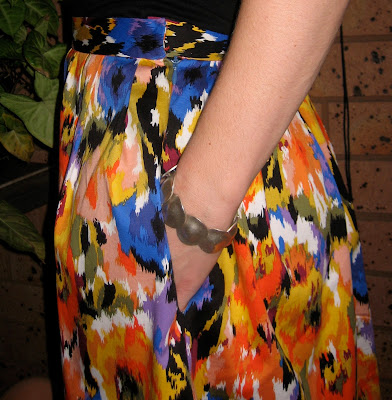
I really love the Cynthia Rowley's collection for Simplicity patterns. This one is no exception. I couldn't wait to make View C (skirt), and truth be told, this is my second version of this skirt. I love it that much! And I love the fabric I used equally, a gorgeous cotton sateen, in an abstract (is that the right description?) floral print. It's bright and happy and perfect for a Sydney summer.


It's what would appear at first glance to be a pretty classic pleated skirt with side pockets, but that's where you would be wrong! The pleats are actually a collection of inconsistent, assymetric pleats, folded one way, then another, around the waistline. I loved that feature, it just adds something a little different.

It's not that obvious though with a casual glance and is probably a bit more visible on an earlier version I made in a plain dark indigo denim...

I live in this skirt!
Or maybe not... they really are assymetrical I swear!

Anywho... The skirt is a pretty easy make - the marking of the pleat positions and fold lines onto the cut fabric takes forever (or is that just me?), but once that's done, it comes together really rather well. At least my first denim version did. I think I was having a bad sewing day on my floral attempt - I think I quick unpicked a thousand times quite a few times. Not happy, not happy at all.

There is a tricky section where you sew the invisible zip into the side seam where there is also a side pocket. Just be careful, take your time and I promise, you won't sew the pocket closed like me. Here's a look-see.


You can just the see the pull-tab of my invisible zip. Ahhhhh, I love invisible zips...

I really do love this skirt. Everytime I wear it, I get the most lovely comments. And it makes me feel swishy and feminine and pretty.

And for the budget-conscious amongst us, at only 1.3m of 115cm wide fabric it's a great, generally inexpensive, wardrobe addition.


SEWN: Leo's Hat - vintage cars, racing stripes, what more could a boy want?

Monday 16 January 2012

I can't believe I just sewed my first ever project for a boy! I guess when I was young it was solely about creating my new oh-so-cool outfit for the next school disco. For years after I simply used my sewing machine for the occasional hem alteration or clothing repair. Then my gorgeous daughter, M, came along and I wanted to sew "pretty little things" for her.

Now, I like to sew pretty little things for me. P is always asking when his first bespoke suit will be delivered. I say my skills are so not up to that just yet!

And so here is Leo's Hat - a special request from a friend of mine with a car/truck/train mad, nearly three year old son, Leo.


The reversible bucket hat is from Oliver and S's "Little Things to Sew". This is a fantastic book which extends on Oliver and S's fabulous clothing pattern range for boys and girls. It has a a whole heap of delicious projects to sew, including this bucket hat. I've previously made one for M, and found the pattern and instructions faultless. The hat comes together beautifully, as you'd expect from any Oliver and S undertaking. And it can be done in just a few hours.

It's fully reversible so it's nice to try and go for different but complementary fabrics, hence...

Vintage racing cars one side...


and racing stripes the other...


I gotta say, I have no idea how those stripes lined up so perfectly! I truly, truly did not make an effort for them to do so, in fact I was cursing myself for picking stripes - what on earth was I thinking? All those panels and all that careful cutting... I just didn't have it in me. So imagine my surprise when I started construction and it all just came perfectly together. Or as P said "You're a freak genius". Yes, thank you P. Maybe we could say I just got lucky.

Car hat + little boy = match made in heaven

SEWN: Vintage Style Pattern 4616

Friday 13 January 2012

Tahdah! And so I present to you my first blog project - Vintage Style 4616.


You might remember from my last post I was rhapsodising View 2. 

P kindly offered to take some shots of the dress in action. Now, neither of us profess to being great photographers, but we are driven to work harder after snapping some shots - blurry doesn't even begin to describe most of them! And now we know why most people won't photograph in natural light in the height of the day. Youch... bright light, not so great photos. Hey, we'll work on it! 

I just adore this dress...


Oh yes, this dress makes me want to kick up my heels!

And what a relative dream to put together. I made it up in some gorgeous cotton poplin from the Vintage Prints range at Spotlight. They've had some pretty great stuff and I've used some other fabrics from the range for various projects - might share them one day.

This dress came together pretty quickly, instructions were easy to follow and the lines of the dress are just lovely. I was worried for a second that it was going to be too short - we all know that look was definitely a 70's one - and I bought no additional fabric to allow me to lengthen the skirt. Eek! I ended up turning a verrrrry small hem.

Note to self: must remind DH not to cut off the bottom of skirt shots in the future!

Now whilst my bust measurement matched the pattern size, it was miles too big. I attempted an initial tissue fitting, rather than making a toile, and it actually looked fine. Woops - when made up in fabric, however, quite a few inches needed to be taken in on the bodice sides and an inch or so on the hips. If I'd realised a little earlier in the construction, I'd have taken out some of the excess on the centre back seam. Oh well, we live and learn.

Only real departure I made from the directions was to omit trim and insert an invisible zip at centre back rather than a regular dress zipper. I did in fact attempt the traditional centred zipper, but for the life of me couldn't resurrect the know-how I am sure is still in that rattly old brain of mine. I remember learning about them in high school textiles and design classes, and I'm sure I was a total wizz at them, but that is over 20 years ago. And with a 55cm/22inch (!!) zip required there is no room for wonky lines of stitches visible down the back of one's dress. So I switched it out for an invisible zip which I far prefer anyway.


Oh and those fluttery shoulder ruffles... swoon... they deserve a shot of their own..


And that's that folks - first project shared. Hoped you enjoyed it. I am just finishing my next project and am excited to share. See you again soon!

Castles by the sea

Sunday 8 January 2012

Hello, hello!

Gotcha! You all thought I was merely another flash in the pond, didn't you?

Well I'm back. I've been off doing a little bit of this...


Well, what's a girl to do when some incredibly generous friends offer you the use of their family's beachfront holiday house for a few days? The girl says "Hell yeah!" "Yes, thank you"!

Is there anything else quite like the sound of the ocean gently lapping against sandy shores mere metres from your windows? I sleep so well on stays like this - it reminds me of childhood summer holidays when my family and I would pack up our caravan and head to the coast. North, south, it didn't matter - these are the sounds that set my soul at ease.

Those mid afternoon naps I took whilst my toddler slept may have also helped me feel re-energised and centred. I never do that at home, too much to do and too little time.

But I do have a project to share...

Another wonderful friend, who knows of my obsession interest in vintage patterns raided her mother's pattern stash and came up with a number of gems. Below is Style Pattern 4616, copyright dated 1974. Woot, woot! I just love View 2 and those ruffly sleeves... swoon. Who doesn't like a 70's flashback?


Anywho, I didn't get a chance to photograph the finished project prior to our impromptu holiday. So stay tuned and I'll share the finished project and pattern shortly...

It's a New Year... welcome to the blogosphere

Sunday 1 January 2012

Happy New Year!

So first things first... I decided on a personal motto/resolution for 2012... "Ride your own race".

That's right, it's time to ride my own race, sew at my own pace and be a little kind to myself along the way.

I'm new to blogging. Have been following a number for some time, mainly blogs of crafty Mummas, and decided that perhaps I'd like my own little space to showcase what I've been sewing - and perhaps share the occasional rambling about life, love and the universe. So without further ado... here is "Sew at your own pace".

I'll be back soon, promise... just gotta set things up a bit. It's the hazard of getting caught up in New Year excitement and the need to just get started.
CopyRight © | Theme Designed By Hello Manhattan